Recipes for Mom {intro + part 1}
/Welcome to the new blog series, Recipes for Mom! I can’t wait to get this started and expand on it more + more. So many ideas rolling around in my head!
So what exactly is this new series?
I could have called it…
- recipes to a new foodie
- recipes + tips to refresh your life
- recipes for health
- healthy kitchen 101
However, I decided on “Recipes for Mom,” for a few reasons.
Over the last 20+ years, my mom has racked up quite the medical history. Her problems have all stemmed from a diagnosis of ulcerative colitis, at age 40. I’m not a medical professional, but my opinion is that mom’s medical history was not a direct result of what she was eating. Sure, there were probably certain foods that would have helped her UC and some that made it worse, but the ulcerative colitis was not caused by dietary choices. Also, 20 years ago, treating illness with food wasn’t as popular as it is today. She may have been able to better control her UC, but at the time, it didn’t seem to be an option. She also had an extremely severe case.
A brief rundown of my mom’s medical history:
- ulcerative colitis, treated with a slew of medications, that caused many of the following
- arthritis
- osteoporosis
- hip replacement
- large colon removal
- bacterial meningitis [after being on immunosuppressant drugs, near death experience]
- rotator cuff surgery
- sleep apnea
- obstructed sleep apnea surgery
- sciatica problems [since June 2010]
- sciatica surgery [February 2011]
And this is just from what I can remember!
Throughout all of this, it hasn’t been easy to stay on track with constant healthy eating. My mom also has a fairly high-stress job, with a lot of take home work each night. She doesn’t have hours of time on her hands for grocery shopping + cooking. My dad is also very busy with a co-owned appraisal business, typically working 6-7 days/week. And there’s also the golf addiction. ;)
My parents don’t eat poorly, by any means, but they are always saying they want to do better. They’ll try things that I have on the blog here + there, but I think some of the recipes + foods are a bit intimidating.
Since my mom’s latest sciatica problems, it was really hard to stay on track. She was in pain. A lot of pain. All over her body. The last thing you want to do when your body is in fiery pain, and having just worked a long day, is be on your feet in the kitchen. Even when you’re not in pain, it’s hard to get in the kitchen after a long day.
Healing from surgery, has taken months. It was extremely difficult. She was out of work for almost 2 months and in constant pain. She has finally started to feel a bit more like herself in the past few weeks. Ever since my trip home and her trip out to Colorado, my mom has had a surge of motivation to get back on track with food + exercise. She [and my dad] want to eat less meat, try new foods, eat less packaged/processed foods, and learn how to quick a handful of go-to weeknight meals that don’t take an hour to prepare.
Please remember that I am not a registered dietician, doctor, or trained health professional. Please consult your doctor before changing your diet, starting a new fitness routine, and for all medical related questions.
The basis of this new series is for beginners wanting to enter the world of health + ditch the idea of going on a diet. This will be about your diet, but it’s not about going on a diet. It’s for people who are confused on how + where to start and are not familiar with things like quinoa, kale, millet, tempeh, buckwheat, chia seeds, flax, etc. It’s for people curious on what items to stock in their pantry and what kitchen tools are most worth investing in. It’s for people that want to have fun with food and not see it as a chore, or something to be afraid of.
Simplicity in the kitchen!
My plan is not set in stone, and I can’t wait to expand on it more + more in the coming months. My hope is to inspire my mom + dad, friends, YOU, anyone at all. Maybe this will all be redundant for you. Maybe you will hit the “snooze” button on these posts. Maybe this is just the thing you needed. Either way, I can’t wait to get started!
One of my most used kitchen tools is the fine mesh strainer, pictured below. I use it practically everyday, and sometimes numerous times for 1 meal.
This little tool, will set you back $5-20, which will be worth it in the first month.
Fine mesh strainer uses:
- rinsing beans
- rinsing grains [quinoa, millet, etc.]
- draining small batches of pasta
- draining liquid from any canned good
- sifting flours for baking
- straining cooked liquid mixtures, to keep out food pieces
- straining citrus juices to keep the seeds out
Typically, I use this for rising grains + beans, which I eat a whole lot of!
A few places to buy a fine mesh strainer: [I recommend 6-8”]
- Amazon $16.99 [for the 6”]
- Target $4.99
- Crate + Barrel $9.99 [the one I have!]
What are we cooking today?
Millet! What exactly is millet? It’s a nutrient dense, gluten-free seed, that has a mild-nutty flavor, with a fluffy texture.
Here is the nutritional profile for 1 cup of cooked millet.
1/4c uncooked millet, yields approximately 1c cooked millet
*Edited to add – Millet actually has a high glycemic index level. I confused the original number with the glycemic load number. My apologies!!
Millet is packed with nutrients and health benefits that you can read about here. It’s quite possibly my favorite seed/grain and is extremely versatile. Millet can be paired with almost any meal and can take on any flavor you want!
Where can you find millet? Great question! You most likely find millet in the bulk section of your health food store. If you can’t find it, you may want to ask your store to carry it. You can also always buy in bulk online! I love storing my bulk goods in 32oz mason jars. It keeps them organized + fresh! At Whole Foods, I can buy organic millet for $.99/lb!
The first thing you’ll want to do is measure out your millet, depending how much you want to cook, dump it in your fabulous new strainer + rinse!
I always use cold water and rinse for about 30 seconds, until the water runs clear.
I typically cook 1 cup of raw millet, which yields about 4 cups cooked millet. When I do this, I start off by adding 1T cold pressed, extra virgin olive oil to a medium pot, over medium heat.
After letting the oil heat, I add the millet in.
And then stir for 1-3min until slightly browned. This helps to deepen the nutty flavor of the millet, but can be skipped if you’re in a hurry!
I use 2c water : 1c raw millet ratio. I’ve read 3:1 before, but have found 2c works best for fluffy results. I typically use 100% water, but you can incorporate low-sodium veggie stock [or organic/free range chicken/beef stock] for more flavor.
I bring the millet to a boil.
Stir once. Reduce heat to simmer + cover with a tight fitting lid.
Then I set the timer to 20 minutes, and let it simmer away.
Simmer = small, frequent bubbles
During the cook time, I prepare the rest of my meal. Typically something with beans, and 1-2x a week tempeh or tofu. I also always have some sort of greens involved. We eat kale chips [will get to that soon!], salad, or steamed/sautéed greens every single night.
This particular night, I cooked tofu. It was my best cooked tofu yet! The key to good tofu texture, is pressing out the liquid between dish towels, for 30min.
After 20min, turn the heat off, and move the pot to a neighboring burner. Let sit for 5min. You can also skip this step, but it does help with the texture!
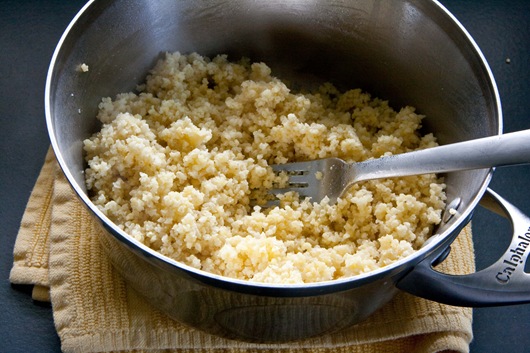
Here is the cooked millet.
Next, you want to fluff it with a fork, just like cooking rice. Using a fork really helps keep things fluffy, light, and slightly sticky.
{fluffy love}
Typically, I top millet with just a little butter or soy free Earth Balance, fine grain sea salt + freshly ground black pepper.
You can dress it up more if you like, but this simple style is my favorite!
The full meal included:
- simple cooked millet
- tofu [tossed in coconut aminos, honey, brown rice vinegar, coconut oil, salt, pepper, garlic + a sesame oil drizzle at the end]
- 4min sautéed kale with garlic + salt
Simple Cooked Millet [4, 1c servings]
- 1c raw millet
- 1T olive oil
- 2c water
- salt/pepper/butter as preferred
- Heat a medium sized pot, over medium heat + add 1T olive oil.
- Rinse millet in a mesh strainer, until the water runs clear. ~30sec
- Add millet to the pot + stir 1-3 minutes, until lightly browned. *optional step
- Add in water + bring to a boil.
- Stir once, reduce heat to simmer + cover with a tight fitting lid.
- Let cook for 20min, until all liquid is absorbed. Do not open the lid or stir while cooking!
- Turn burner off and move the pot to a neighboring burner for 5min.
- Uncover and fluff with a fork.
- Serve and top with seasonings of your choice.
*For more flavor use 1c veggie stock + 1c water, instead of 2c water.
*You can use 1T unrefined coconut oil, instead of olive oil, for a slight coconut flavor. Perfect to go along with coconut curry dishes!
*If you only want 1 serving, using a smaller pot, reduce millet to 1/4c, water to 1/2c, and oil to 1 teaspoon.
*If you want millet all week long for 2-4 people in the house, make a larger batch with 2c raw millet, 4c water, and 2T oil. It will keep in the fridge for about 4-5 days.
Another reason I like to cook millet plain, is so I can use it all week and dress it up however I like. You can reheat millet, with a sprinkle of water in the microwave or in a pot/pan on the stove. Add whatever seasonings you want!
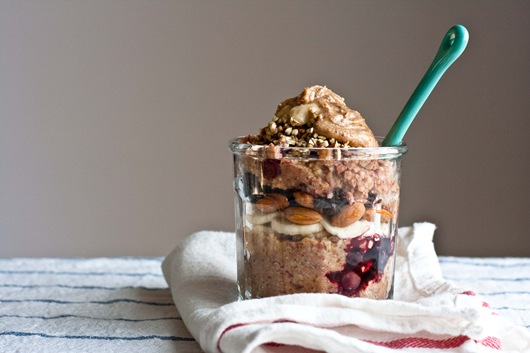
I love using millet for breakfast!

And even like throwing it cold on a salad.

Check out my recipe page for even more millet ideas! In your internet tools, use “find” and search for millet. Then you can arrow through all the recipe titles including the word millet.
And that raps up Recipes for Mom {intro + part 1}
Hope you enjoyed it!
Ashley


