Food Photography Tip of the Week |12|
/Food Photography Tip of the Week |12|
My photography station setup.
I thought we’d take a break this week from a lengthier lesson and check out the area where I take my photos. Last week a reader asked about my photography setup, so here it is!
What should be our breakfast nook is actually my photography station. Since I take photos nearly every day I needed a space where I could keep my photo things out all of the time. Our house is fairly small so the options were limited and we don’t have enough storage space to keep it all out of sight. I also didn’t want to keep everything out in the dining room or living room and the light in those rooms wouldn’t have worked anyway. Luckily, the kitchen gets a lot of light and has enough room for my setup.
My station has progressed from shooting on a stack of boxes when we first moved in, to shooting on a very small + unsteady table, to a large folding table with adjustable height, to the kitchen cart you see below.
The folding table [$36 from Costco] was something I knew we would get a lot of general use out of and I could also use it for my photo table before deciding on a more permanent solution. The table was great because it had 3 adjustable heights which is necessary since my windows are pretty high. I find that if the surface I shoot on is more than a few inches below the window my photos don’t get enough light. However, the table was a major eye sore and took up too much space [it’s really long].
Please ignore the step stool, which is also a huge eye sore.
Also ignore the wavy line where the orange + cream paint meet. We still have to install a strip of wood there.
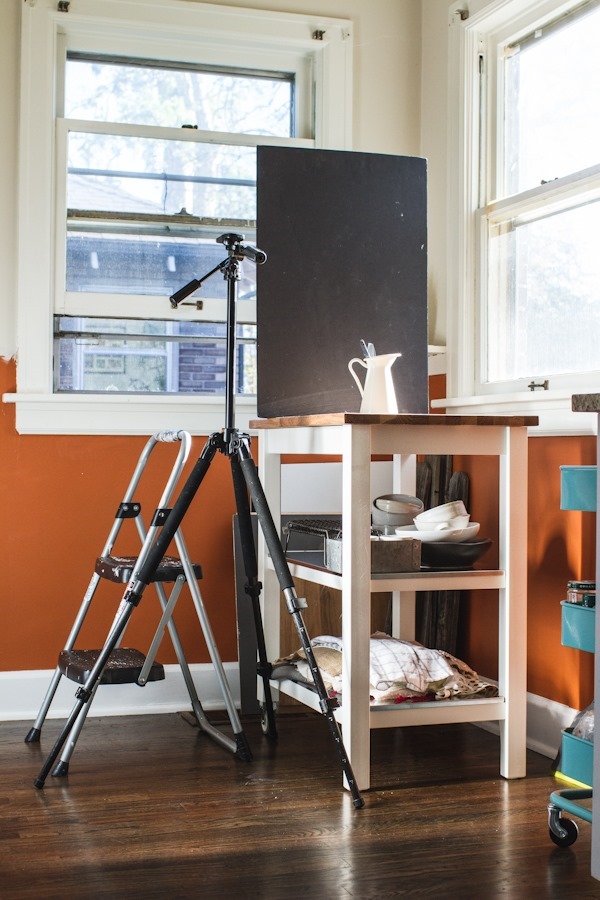
I’ve been searching around for kitchen carts and finally decided on this one from Ikea. I wanted something sturdy but also with wheels since I need to maneuver it in the space depending on the light and where I want to shoot. I also wanted it to have shelves below to store props and linens. I was hoping for something that matched our white kitchen cabinets and didn’t look too out of place. This was definitely the best option and the top surface is butcher block which I can also use to shoot on. Win, win!
The cart fits in the space much better and makes our kitchen feel a lot bigger. Plus, it’s much more pleasing to look at in comparison to the plastic folding table.
The windows are east + north facing, so the light pours in in the morning which you can see below. I took these at 7:30am but usually wait a few hours before I start shooting food so the light is a bit softer. I actually have a pretty hard time with the light in my kitchen. It’s hard to shoot up so high [for overhead shots] and having the two windows can be tricky to work with. Low windows or sliding glass doors would be extremely helpful.
This is one of my typical setups with the black matte board to the left which blocks some of the north light and creates richer shadows in the photo. I take most of my photos from the side of the cart where the tripod and step stool are, but I do move around to other sides for different lighting effects and angles.
I also have this rolling cart from Ikea which holds onions, potatoes, spices and other kitchen staples on the bottom shelves but on the top shelf I stash some of my most used photo items.
I will admit I cleaned the cart for this photo.
-
cookbook stand – incredibly handy
-
fancy napkins
-
straws
-
paper towels for spills
-
camera battery charger
-
q-tips for drips
-
tweezers
-
mini spoons + most used silverware
This is the position I’m usually in when taking photos, especially for my overhead shots. If I’m using the black [or white] matte board it’s typically leaning against a jar like you see below.
I take almost all of my photos with a tripod except for my overhead shots. Since my shooting surface is at counter height my tripod does not extend high enough to get those shots.
And to the left I keep some of my shooting surfaces which also double as backdrops.
So that’s about it for my general photography setup. I feel like it’s a pretty simple setup and I’m loving the space so much more now that I’m using the smaller cart. Let me know if you have any questions!
Hope you all enjoyed the long weekend!
Ashley


