photography 101 {exposure}
/I’m back with the next post in my photography 101 series. Today, we’ll talk about exposure. I could go on for days on this topic, or really any of the others. I plan to write at least one post, showing you how to put it all together, which I briefly go over at the end of this post. I’ll also be assigning “homework” as requested by many of you.
Exposure - The brightness or darkness level of the photo, caused by the amount of light captured on the photographic medium, as the photo is taken.
There are 3 controls that affect + control exposure.
- aperture [depth of field]
- shutter speed [motion/speed]
- ISO [noise]
washed out/blown out photo = overexposed = too long of an exposure
dark photo = underexposed = too short of an exposure
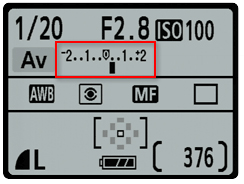
Tip! When working in manual mode, a rule of thumb for a properly exposed photo, is getting the in-camera exposure meter to read right in the center at “0.” However, this is not always the case. Maybe you prefer a slightly brighter photo or artistically, want a photo darker or brighter for a specific reason. Or, maybe your camera shoots on the dark side. Mine does! Aim for setting the exposure meter [aka: light meter] in the middle, then preview the photo and adjust accordingly for your next shot.
[source for all 3 images below]

Brighter ----------------------------------> to the right

to the left <------------------------------------ Darker

When in manual mode, you can’t physically change the exposure reading. You have to adjust the ISO, shutter speed, and aperture settings [one or all of them] to change the exposure reading. When in Av [aperture priority] or Tv [shutter priority] you are able to manually change the exposure reading in the camera.
Typically, when shooting food photos at home, I like to have my exposure set 1/3-2/3 stops above “0.” Below, is 1/3+ stop higher. Sometimes, however, the photo is too washed out and setting it directly in the center works best. Rarely, when indoors, do I ever go into the negative.
Remember, it’s not just aperture/f-stops that change your exposure readings. Shutter speed + ISO affect it as well!
[source]

In the 5 examples below, watch how the shutter speed affects the exposure. The aperture and ISO remain constant. As more light is let in, with a slower shutter speed, the exposure brightens.
- when shutter speed is increased [faster], the exposure is darkened
- when shutter speed is decreased [slower], the exposure is brightened
Remember! The shutter speed is measured in seconds. 1/100 = 1, 100th of a second : 1/5 = 1, 5th of a second
Aperture + Exposure
- when aperture is decreased [larger f-stop #, wider depth of field, less light passing through], the exposure is darkened.
- when aperture is increased [smaller f-stop #, narrower depth of field, more light passing through], the exposure is brightened.
ISO + Exposure
- when ISO is decreased [less sensitive to light], exposure is darkened.
- when ISO is increased [more sensitive to light], exposure is lightened.
The photos below are all properly exposed, while varying the depth of field. To achieve the depth of field I wanted, with proper exposure, I made adjustments to the shutter speed. The ISO remained constant.
Here is the basic rundown of how I set up my photo.
- Set the ISO. I’ve gotten pretty good at being able to read the light coming in our house, and knowing what the ISO needs to be set at. Typically, it’s 400. Sometimes, I’m able to set it to 200 and sometimes I have to set it to 800. Even when using a tripod, I typically keep it at 400 and don’t set the shutter speed slower than 1” [1 second]. This is because the camera can pick up movement from the slight shake of actuating the shutter release button. If I had a detached shutter actuator or used the camera’s delayed timer function, I would have a little more wiggle room with the shutter speed. I have a very beginner dSLR camera, so higher end models might allow you to set the speed even lower, and notice no motion in the photo. Setting the ISO at 400, still gives great, crisp results.
- Set the aperture. This depends how much of the photo I want in focus. Typically, I don’t set it lower than f/3.5 and usually work around f/5, but sometimes all the way to f/7. Remember, the depth of field not only varies by what you set your aperture too, but how far away you are from your subject!
- Set the shutter speed. After setting the aperture, I make changes to the shutter speed, to properly expose the photo. Say the shutter speed was at 1/15” and the exposure meter was reading +1. I know this will give me an overexposed photo, so to compensate, I might adjust the shutter to 1/20” [faster –> less light –> darker photo] to see if that bumps the exposure down enough.
- From there, I take the photo and evaluate the light on the preview screen. I make any adjustments to the shutter + aperture and take a few more shots, so I have a variety to choose from. I also will manually play around with the focal point, but that is another lesson for another day.
Once again, I hope this has helped introduce you to the idea of exposure and what that little light meter on your camera is all about. Understanding the light meter should start to make things easier as you’re playing around in manual mode. You know if it’s reading at “-2” that some of your settings definitely need to change! Check all of your settings to evaluate where you need to make changes. You might even have to increase your ISO, if your shutter speed is already set to a fairly slow number.
Dinner recipe coming tomorrow! Stock up on a few russet potatoes, Greek yogurt, green onions, liquid smoke, broccoli + tempeh [or chickpeas] to get ready!
Yesterday’s cookie recipe, was entered in a contest for the Love Grown Foods Holiday LOVE cookie contest, with the other LOVE bloggers. If you want to check out the entries and cast your vote, head over to the LGF facebook page and “like” your favorite. All of the entries look delicious! If I win, the LOVE prizes will be shared!
Ashley


