photography 101: the light box
/Awesome day of snowboarding with no photos to show! I had the wrong memory card for my point n’ shoot. Whoops! We headed to Keystone pretty early and got a good half day of riding in. It always takes a few days to get back into the swing of things. My quads were killing after a few hours! As were Chris’s. He’s learning how to telemark ski, which is basically like doing lunges the whole way down the mountain. No thank you!
We got home to Ft. Collins around 5pm and I felt like starting a project before dinner.
Hello light box! I’ve been meaning to make this for over a year now, but just haven’t gotten around to doing it. Ashley inspired me to get to making it the other week…so here I am! I looked at her photos and a bunch of others that people have posted and just went to town.
I had almost every single thing that I needed at home. The only thing left to buy are a few gooseneck lamps to hold the light bulbs. Remember the other day I showed you the new daylight bulbs I bought? I’ve had them screwed into a few kitchen outlets, but soon they will help light my box! […did I really just say that?]
Enter box. Large moving box that was in the garage.
Task #1 – Can I fit the newspaper into box #2?
Task #1 – Completed. Sort of.
This light box assembly was much easier than I expected. You don’t have to be too careful. It doesn’t need to look pretty. I spent no longer than 30min cutting this up and getting it photo ready.
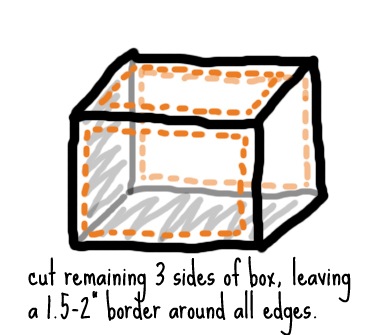
Task #2 - Cut a panel out of 3 sides of the box. I left a 1.5” gap around the edges and cut the square out with a razor blade. An box cutter would have been safer, but what can I say…I like danger.
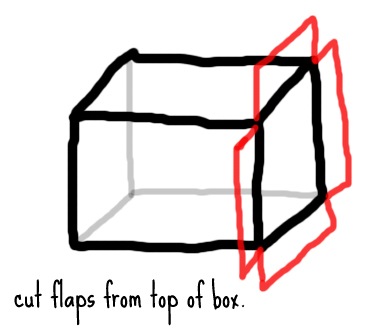
I’ll draw a diagram…don’t you worry!!
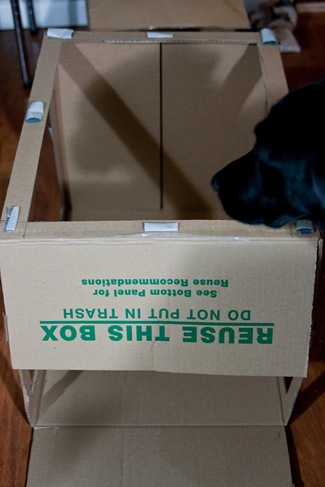
Task #3 – After cutting the box, put your dog inside.
Oops, I almost broke the box.
Task #4 – Keep Kenna away.
Task #5 – Sloppily roll + stick duct tape around the edges. 3-4 pieces on each edge will do!
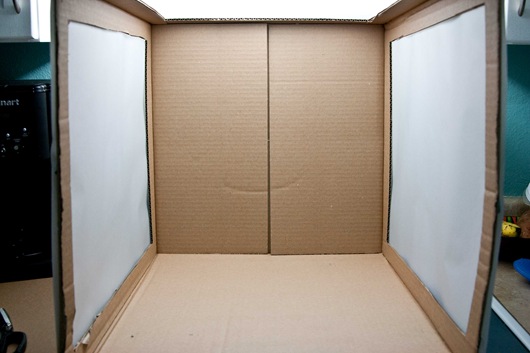
Task #6 – Place vellum on one side, and press down where the tape is. Use scissors to cut the edges.
What the heck is vellum? It’s translucent paper, that is often used for ink drawings. I used to use this a lot in undergrad school for Architecture. We would slave away inking on this paper, with crazy pens of all sizes. It’s also used in calligraphy, the Torah, and archival purposes. How do I know that? Wikipedia told me.
I have seen all sorts of paper used, but I thought this would be the best for now. I picked up 3 sheets from Hobby Lobby for about $2.99 a piece. Michaels may have it, but I’m not positive. Just make sure you get a large enough size to cover the hole.
Ashley suggested using tissue paper. With her light box, she used a white fabric shower curtain liner. Both great alternatives. What I liked about the vellum is that it doesn’t have creases and lays nice + flat.
Task #7 – Cover the other two sides.
The box I used was 18x18x24. You could use a square box or rectangular. It can be smaller than this or a little bigger.
Look, I listen to instructions!! “REUSE THIS BOX – DO NOT PUT IN TRASH” I should call the maker of this box and inform them that “light box” is not listed on their reuse recommendation list.
Task #8 – Cut flaps off front of the box.
Task #9 – Have a glass of wine after photographing in the box.
This isn’t completely done yet. I didn’t hang a pretty backdrop and don’t have the lights set up. I just set this on my stove directly under the daylight bulb I put in the stove light bulb outlet. Pretty good light for just one bulb! Unfortunately the wine was not so bueno.
Box on top of stove, under light. Notice the bowing on the right side. That would be Dakota’s fault…or my fault I guess, from the outcome of task #3. No worries though. Like I said it doesn’t need to be perfect!
Not much to cleanup!
Tools needed:
- pen
- razor, preferably xacto or box cutter
- straight metal edge
- duct tape
- scissors chewed on by your dog
Lightbox in 30min Flat
- Gather tools + box [approximately 18x18x24]
- Cut front flaps off box with scissors.
- Tape down flaps on the bottom of the box if they don’t lay flat.
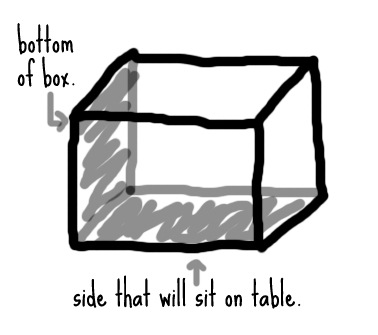
- Decide which side you want to sit on the table. Do not cut that side!
- On the 3 other sides [not the bottom], measure + mark a 1.5-2” border around each side. Refer to diagrams below and/or photos above.
- Cut the rectangle out [that you just drew on each side] with razor and straight edge.
- Roll 3-4 pieces of duct tape per edge and pat down. There should be 12 edges total.
- Place vellum, or other translucent paper/material on the three sides. Cut any extra hanging off the sides.
Diagrams for a few of the steps…hopefully helpful!
Step 2
Do not cut these sides:
Steps 5 + 6
Place tape + vellum or other paper, as stated in steps 7 + 8!
Ta-daaaa!! You’re done! Now you just need to get some material/paper/paint to cover the bottom, which is now the back of the box. More on the light set up soon. If you’re itching for more info, definitely check out Ashley’s complete post!
…
Now, how to light up your leftovers, not using the light box.
Chris + I couldn’t wait to tear into the leftovers from last night’s stuffing.
To freshen up the leftovers…although they hardly needed freshening! I can assure you this from all of the bites I took cold out of the fridge…
I sautéed another Field Roast sausage.
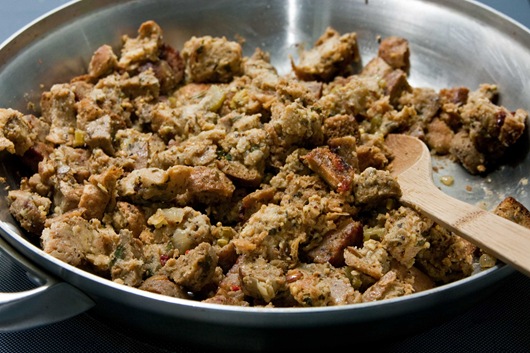
And then threw the stuffing in the pan to heat it. I thought this would be much better than microwaving and it was. It was still very soft + moist but crisped up a bit too. Yum!
The light box was not used for these photos. I wasn’t about to put a huge box on top of a still hot stove!
Added some fresh grated parmesan cheese on top! Delicious dinner in 10min flat. For original stuffing recipe, be sure to check it out here!
Hope you all had a fabulous Thanksgiving break and are feeling refreshed!
What was I up to the past few days?
- Prepped a ton of food!!
- Had an awesome Thanksgiving with friends.
- Relaxed the day after.
- And made more stuffing.
Night!
Ashley


