Lemon Pistachio Donuts

It's National Donut Day! Oh my gosh am I excited to share this recipe with you. And, it's Friday. What could be better?

Maybe a National Donut Day party? Yep. That would make things even better.

Pistachio Topping for Lemon Pistachio Donuts |  edibleperspective.com

This recipe for Lemon Pistachio Donuts (yes, I converted from "doughnuts") has got to be one of my favorite ever. I've probably said that more than a dozen times before about past donuts--all 101 of them--but they've all been blocked from my memory with this latest creation.

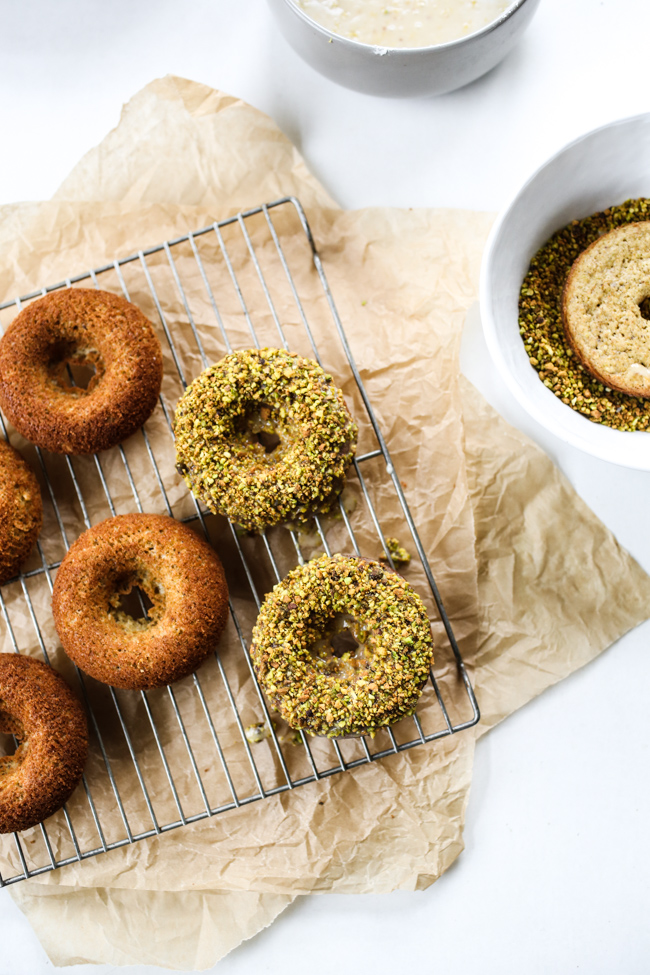
A pillowy soft donut filled with pistachio meal and lemon zest that's then dredged in a lemony glaze and covered in a thick blanket of ground pistachios.

!!!!

Lemon Glaze for Lemon Pistachio Doughnuts | edibleperspective.com

I first made this recipe a few weeks ago in anticipation for a visit from my mom + dad. My mom recently had a birthday and she is a major pistachio lover. It took a few tries to get the right texture (I changed things up a bit from the usual donut base recipe) but the time spent trying to figure it out was 100% worth it.

Lemon Pistachio Donuts for National Donut Day | edibleperspective.com

I told you...a blanket of pistachios.

Gluten-Free Lemon Pistachio Donuts | edibleperspective.com

The texture is where it's at with these donuts. They're soft but slightly gooey thanks to the sweet glaze that's poured over top and they obviously have a lot of crunch. But not break your teeth kind of crunch. It's pretty much the closest thing you'll ever find to a fried donut that's not actually fried.

National Donut Day with Lemon Pistachio Donuts | edibleperspective.com

Chris and I devoured the entire batch and then we split the next batch with my parents. And I'm obviously making another batch TODAY!

Lemon Pistachio Donuts - Baked! | edibleperspective.com

Print Recipe!

Lemon Pistachio Donuts

gluten-free // yields 8-9 standard donuts (with this pan)

for the donuts:

  • 1/2 cup gluten-free oat flour
  • 6 tablespoons sifted pistachio meal (ground from roasted/salted pistachios)
  • 1/4 cup sweet rice flour
  • 1/3 cup pure cane sugar
  • 1 teaspoon baking powder
  • 1/8 teaspoon salt
  • 2 large eggs
  • 1/4 cup whole milk (or unsweetened almond/soy)
  • 3 tablespoons applesauce
  • 2 1/2 teaspoons lemon zest
  • 2 tablespoons melted unrefined coconut oil (lightly cooled)

for the glaze:

  • 1 cup powdered sugar
  • 2 1/2 - 4 tablespoons 1/2 and 1/2
  • 2 teaspoons lemon zest

Preheat your oven to 350° F. Thoroughly grease a donut pan (or pans) with butter or coconut oil.

Mix all dry ingredients in a large mixing bowl.

In another mixing bowl, whisk the eggs. Then whisk in the milk, applesauce, and lemon zest. Whisk in the coconut oil and then quickly pour over the dry ingredients. Whisk until just combined.

Spoon into your donut pan about 1/4-inch from the top. Bake for 16-22 minutes, until golden brown and a toothpick comes just slightly sticky. Let cool for 10-15 minutes, then slide a thin + stiff spatula around the donuts to help release them. Place on a cooling rack until fully cooled.

Meanwhile, sift your powered sugar. Thoroughly whisk glaze ingredients in a shallow bowl wide enough for one donut to fit. Place ground (or finely chopped) pistachios in a similar bowl. Invert each cooled donut into the glaze and then let the excess drip off. Dip into the pistachios next then place on the cooling rack to let the glaze set. Repeat with remaining donuts.


Notes:

  • If using unsalted pistachios, use 1/2 teaspoon salt with the dry ingredients and add a sprinkle of flaked sea salt on top of the donuts.
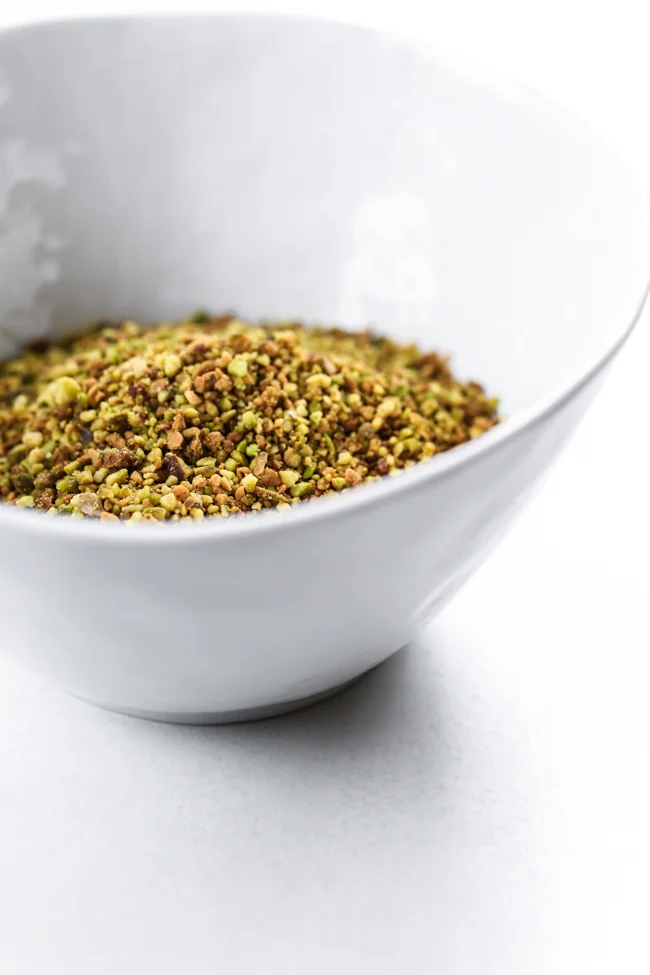
  • To make pistachio meal: Place about 1 cup salted + roasted pistachios in a food processor. Turn on until well ground, about 15 seconds. Make sure to not let process too long or the nuts will start to turn into nut butter. Place ground pistachios in a fine mesh strainer and sift the meal into a bowl. Measure 6 tablespoons and use what's in the strainer to top the donuts with. Grind more if needed for the topping. 
  • Feel free to sub almond meal instead of pistachio meal. 
  • You can sub sorghum flour instead of sweet rice flour, but the texture is thicker and more cake-like. The sweet rice flour helps give the donut a soft and slightly gooey texture.
  • Sweet rice flour can be found in many natural food stores (Bob's Red Mill and Ener-G brands are cheapest) or very easily at Asian markets (aka: glutinous rice flour).
Lemon Pistachio Donuts | edibleperspective.com

Hope you get your donut on today. 

Happy Friday.

Ashley

p.s. Be sure to check out the donut party over on Tumblr + join in with your creations! The talented Melissa designed the fabulous graphic you see below and organized this rad party. You can also follow these 2 hashtags to catch all of the donut fun! #national🍩day + #nationaldonutemojiday

National Donut Day | graphics by: Melissa at, The FauxMartha


Vanilla Muffins

Friday! Friday!

We're starting this Friday off right with vanilla muffins. Vanilla muffins that are so full of goodness I can hardly stand it. I would definitely call myself vanilla obsessed. It's one of my all-time favorite kitchen ingredients and plain as it may be, my favorite ice cream flavor. 

This post is sponsored by Rodelle. All products have been tested and approved by my taste buds. 

Vanilla Bean Crumb Muffins | Edible Perspective

A few months ago, I had the chance to meet some of the staff at Rodelle to learn everything there is to know about vanilla. Well, maybe not everything but a whole heck of a lot. I've been a long time fan of Rodelle's vanilla products, but I'm thrilled they reached out so I could learn even more. 

What stood out most to me was how they frequently visit the farms in Africa for more than just quality control of their product. While quality is very important, they focus much of their time and effort in making sure there are safe and sustainable working environments for the farmers. They also help support the communities as a whole by providing things like clean drinking water, safe cooking stoves, and with the microfinance program. Rodelle did not ask me to tell you any of this, but I was so impressed by their efforts and felt compelled to share. 

Vanilla Bean Crumb Muffins | Edible Perspective

While the vanilla beans I received from Rodelle were the most fragrant, sticky, and plump I've ever encountered (honestly), I wanted to see if steeping them in hot water would make it easier to scrape the seeds and result in a larger yield. This totally worked! No vanilla beans were left behind! It was nice to feel like no beans were going to waste. I'm sure it's especially helpful if your beans have dried out a bit.

Recently, I was also able to tour the factory in Ft. Collins to take photos for a freelance project. I cannot even describe the intensity of the vanilla aroma that takes over the entire facility. I obviously loved it.

Vanilla Bean Crumb Muffins | Edible Perspective

Have you ever made vanilla sugar before? I used muscovado sugar (it tastes like caramel sugar!) and followed Alton's simple instructions. As if my vanilla obsession wasn't bad enough.

I used the vanilla muscovado sugar as an alternative to the vanilla crumb topping for a few of the muffins. So good either way or with some of both! 

Vanilla Bean Crumb Muffins | Edible Perspective

I also learned something about crumb topping in my trials.  

If you melt the coconut oil (or butter in some crumb topping recipes) you'll achieve a chunkier topping like you see below. However, if you use softened coconut oil (or butter) it will result in more of a crust topping that spreads over the entire muffin. It seems like the opposite should happen as the dough with the softened coconut oil is much crumblier before baking. But for whatever sciency reason, the melted oil gives you that real-deal "crumb" look.

Moving on....

Vanilla Bean Crumb Muffins | Edible Perspective

And because I'm slightly strange and don't like crunchy things in my muffin but they're okay on top of my muffin, I've added cacao nibs to the crumb topping.

It provides a delicate crunch and slightly bitter, chocolaty bite to contrast all of that sweet vanilla flavor.

Vanilla Bean Crumb Muffins | Edible Perspective

Print Recipe!

Vanilla Muffins with Crumb Topping 

heavily adapted from my citrus poppy seed muffins (guest post on 80-twenty)
gluten-free // yields: 12 standard muffins

for the crumb toppings:

  • 3 tablespoons melted coconut oil
  • 1 teaspoon pure vanilla extract
  • 1/2 cup + 2 tablespoons gluten-free oat flour
  • 1/4 cup gluten-free rolled oats
  • 3 tablespoons muscovado sugar (or coconut sugar/sucanat)
  • pinch of salt
  • 3-4 tablespoons cacao bean nibs

for the muffins:

  • 1 cup gluten-free oat flour
  • 3/4 cup almond flour
  • 6 tablespoons muscovado sugar (or coconut sugar/sucanat)
  • 1/4 cup sorghum flour
  • 2 teaspoons baking powder
  • 1/2 teaspoon salt
  • 1/4 cup milk
  • 1/4 teaspoon packed vanilla beans, scraped from appx. 2 plump pods
  • 3 large eggs
  • 1/4 cup applesauce
  • 1 tablespoon pure vanilla extract
  • 1/4 cup melted unrefined coconut oil (lightly cooled)

Preheat oven to 350° F. 

Pour the coconut oil for the crumb topping in a small mixing bowl. Add the vanilla extract and stir. Then add the oat flour, oats, sugar, and salt. Stir/mash with a fork until a cohesive dough forms, similar in consistency to a soft cookie dough. Mix in the cacao nibs. Set aside. 

Line a muffin tin with 12 liners.

In a large bowl stir the oat flour, almond flour, sugar, sorghum flour, baking powder, and salt until well combined.

In another bowl, briskly whisk the milk and vanilla beans together until the beans are evenly distributed. Add in the eggs, applesauce, and vanilla extract and whisk until well combined. Whisk in the oil and then immediately pour into the dry bowl. Stir until you no longer see dry flour.

Scoop into the muffin liners, filling about 3/4 of the way to the top. Break up the crumble topping and sprinkle over top of the muffins. Quickly place in the oven and bake for 17-22 minutes, until the edges are light golden brown and a toothpick comes out nearly clean. You want the toothpick slightly sticky (but not gooey). Let cool for 10 minutes in the pan and then transfer to a cooling rack. Allow to cool for at least more 20 minutes before serving.


Notes:

  • I used Rodelle's Pure Madagascar Vanilla Extract and Madagascar Vanilla Beans in this recipe.
  • To get the most from your vanilla beans, steep them in hot water for about 10 minutes. Then, blot dry, trim the ends with a pairing knife, slice down the center (through the top layer only), and scrape the entire inside of the pod with the dull side of your knife.
  • I do not recommend subbing any flours. However, for a stickier/denser muffin, use 1 cup oat flour and 1 cup almond flour and leave the sorghum flour out. The sorghum helps lend a fluffier texture.
  • If you don't have vanilla beans on hand: sub 2 tablespoons vanilla paste, or 2 tablespoons pure vanilla bean extract
  • In the crumb topping, feel free to add a small pinch of vanilla beans if desired. Or, instead of 1 teaspoon pure vanilla extract, sub 1 teaspoon vanilla paste.
  • If you want more of a crust on top of the muffin rather than a crumb topping, use 3 tablespoons softened unrefined coconut oil and reduce the oat flour to 1/2 cup. The dough will be crumbly.
Vanilla Bean Crumb Muffins | Edible Perspective

Happy weekending!

Ashley

This post was sponsored by Rodelle. Opinions are always my own and products are thoroughly tested before sharing. Thank you for supporting the occasional sponsored post that helps fund all the deliciousness you find here!