
Camera Equipment for Food Photographers
/Hello + happy Friday!
Today I'm sharing a look into my "studio" to see the latest photography equipment I'm using. I recently made a few big upgrades to my equipment lineup and wanted to give you all an update. I had a hard time researching and trying to figure out exactly what I needed, so I thought this might be a helpful resource for some of you.
Welcome to my photography corner that does not actually photograph well. The space allows for great photos to be taken, but the space doesn't like having its photo taken. So basically, apologies for the blown out window photos.
Prepare for a spewing of words. Let's begin.

I functioned for many years off very beginner equipment. I started with a point + shoot and then stole my husband's entry level dSLR camera when we moved to Colorado. He bought a few lenses that were very affordable, so I plunked around with those trying to figure out what the heck I was doing.
I was even able to shoot my cookbook with that same entry level camera. It wasn't until about 3 1/2 years later that I upgraded to something a little more powerful. I needed something with more ISO capabilities, live-view screen mode, higher resolution, etc. At the time, the Canon 7d was the best option and the best price. Up until a few months ago, I was also using the tripod Chris bought with our original camera. It was a somewhat basic Manfrotto that was lightweight and good for travel/outdoor photography. That was Chris's plan for the camera until I stole it. Over the years I've done a mix of tripod + handheld photos and love both for different reasons.
Because of a few recent large-scale freelance jobs it came time to make a few more serious upgrades. A few of the jobs required the photos to be taken with a tripod (for super sharp photos with a low ISO), and while mine had served its purpose for many years it was time for something sturdier, taller, and with better overall functionality.
As you know, I take a LOT of overhead shots and it was killing me that I couldn't take them on a tripod. I take my photos at counter height (because of how high the windows are) and have to stand on my tip toes on a step stool for every overhead shot. It was a little nerve-racking, a little scary, and it also caused me to have to take tons of extra photos to ensure each of the shots I wanted to get was fully in focus. This also caused editing to take longer, with having to sift through all of those photos.
I wanted to give some the back story to let you know this list of equipment is in NO way a list of things you must have to start in food photography. It all depends on what you're trying to do! I got along for many years with very entry level equipment perfectly fine. When I decided to really pursue food photography and I was getting a steadier workload, I decided it was time to start upgrading. It's been a slow and steady process, and I've been very mindful before pulling the trigger on each and every purchase.
It has been challenging to find information on more advanced setups for food photography, so I wanted to be sure and document what I am currently using and why. Hopefully this will help some of you out in the future!

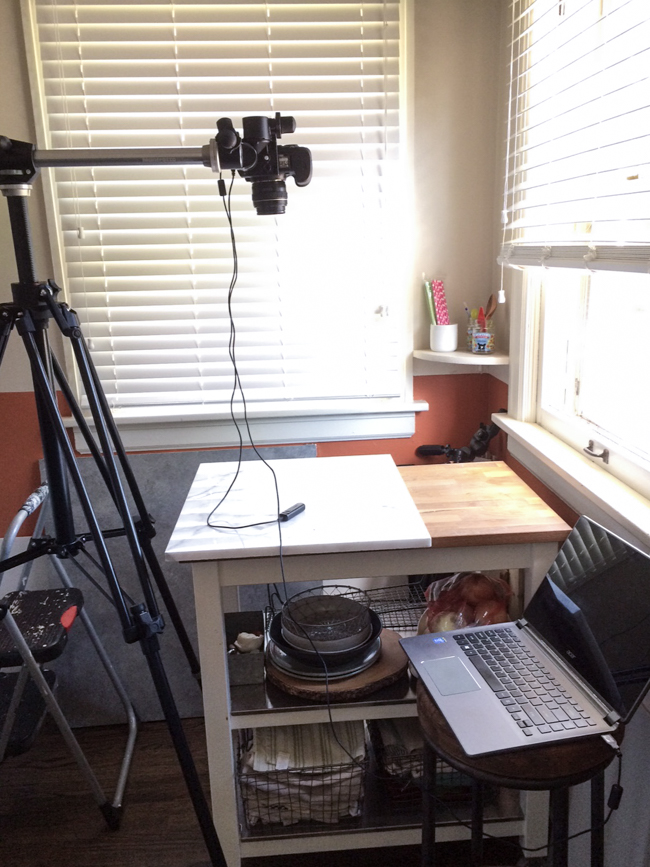
As you can see above, I'm working in a pretty tight space. You should see the sizes of some of the boards I use and how I maneuver them into and out of the space when my tripod is all set up. It's scary.
Let's also note the cloudy wood floors and very fingerprinted fridge.
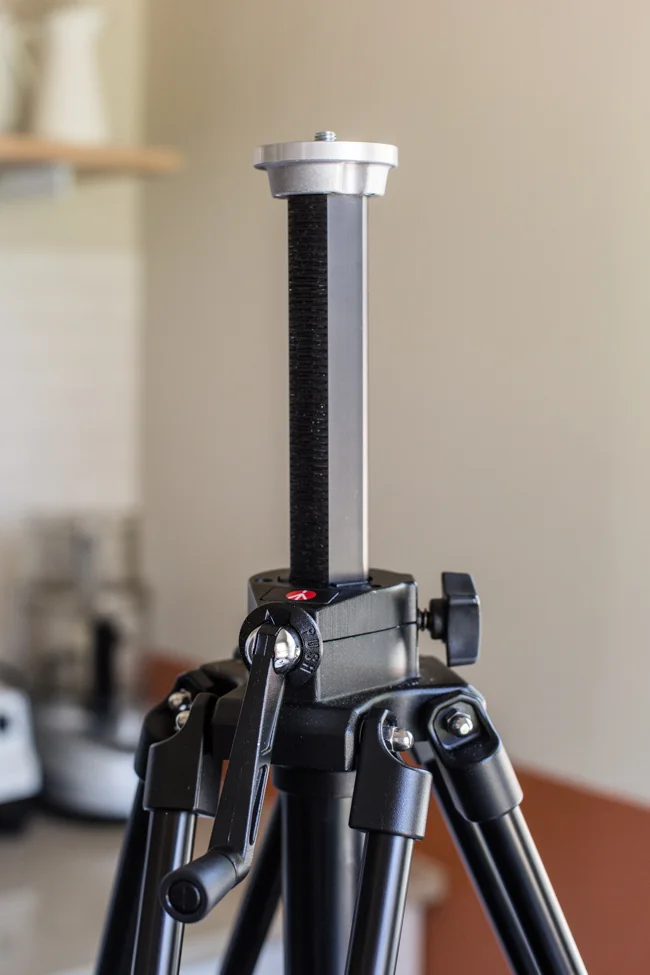
Below is my new Manfrotto Triman tripod. I am IN LOVE. This baby extends (with the center column extended) to 7'5"!!

It also has a geared center column, so you can slowly crank it up and lock into place. It's much more gentle and a lot easier than pulling/pushing the center column up/down and then locking it in.
It moves like butter. I still get excited every time I move it up and down. NERD.
If you don't need a tripod quite that tall (like if you shoot on the floor!) this Manfrotto model would be a great option. It has a built-in center column that flips with a button 90° to a lateral arm for overhead shooting. I originally bought this tripod but it was way too short for what I needed. It saves you from having to buy a separate lateral arm, which I had to buy. Just remember, when you flip the center column to 90° you lose about 18-inches of height. That was what I didn't think about! Doh!
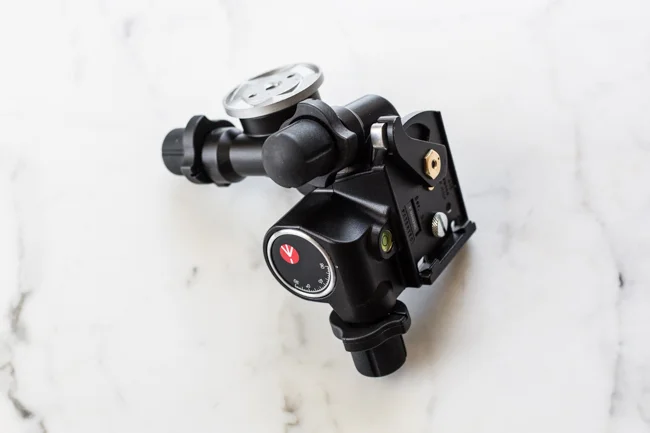
Below is my new best friend!!! It's the Manfrotto lateral arm! If you see the black version online it's the exact same thing, except more expensive. I'm totally, completely, ga-ga over my new tripod setup. Even though I will admit it's a pain in the ass to set it all up and change from overhead to vertical shooting, it's 100% worth it. To be hands-free taking overhead shots is AMAZING.

And next up is my buttery, smooth Manfrotto geared head. I could not figure out a good way to photograph this thing, but this is what attaches your camera to the tripod (or lateral arm extension). It allows you to angle your camera in any direction making tiny micro-adjustments. The geared head is a major game changer.
....iPhone photos from here down....
Now, here's what the setup looks like when I'm getting ready to take overhead photos. I about had a heart attack the first time I set the camera up. I don't think I let go for a full minute.
IS IT GOING TO STAY PUT??
I also recently purchased the Canon 5d Mark iii. I was able to snag a refurbished model from Canon's website to save a few hundred bucks. Pretty rad. I also finally bought the Canon 100mm 2.8/L macro lens. It's insanely amazing. I also caught this on sale!
However, most of the time I'm rocking my Canon 50mm 1.4. It costs about $350 and is a killer lens! I do also have the Canon 35mm 1.4/L (purchased last year). It's a bit harder to use on a full-frame camera (gets a bit wide) for food photos, but it's still a lens I love and need to experiment more with on the new tripod.

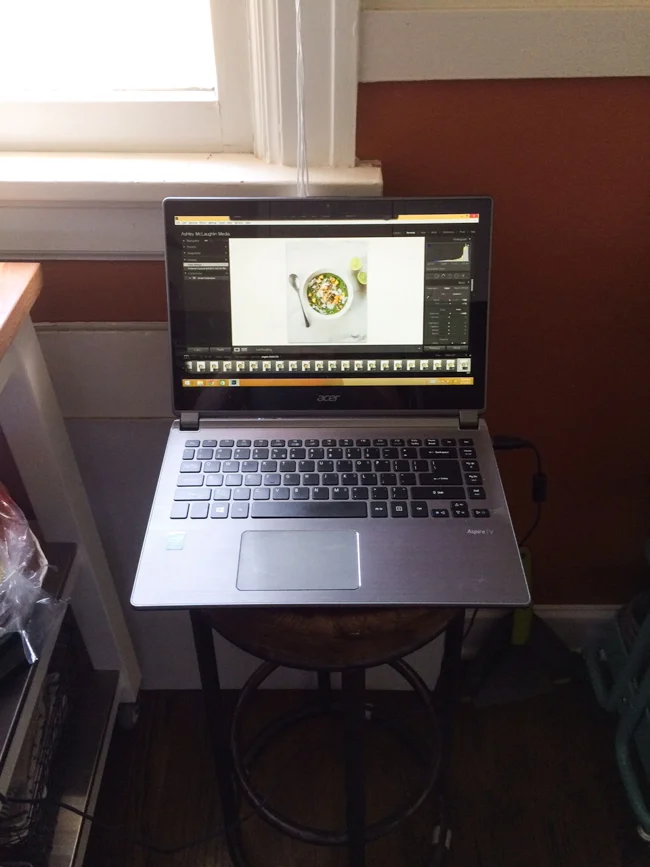
With the tripod all set up I then tether the camera to the computer and turn on "tether capture" in Adobe Lightroom. (I have a very basic Acer brand laptop I bought for travel, but it also works perfect for tethering! I edit everything on my desktop with a higher quality screen.) Every photo I take pops up immediately in the program so I can check it out. Pretty snazzy.
Here's my basic workflow:
- Set up camera on tripod vertical or with lateral arm.
- Tether to the computer.
- Place food items on the surface.
- Stand on the stool and get the framing how I want it.
- Adjust camera settings for depth of field, light, etc.
- Stand by the computer and take each photo with my remote shutter.
- Check out the photos on the computer.
- Make styling adjustments as needed..
- Make camera adjustments from the stool if needed.
- Repeat until it's juuuust riiiight!
Here's the view in Lightroom when I'm connected.
And here's the zoomed out look when food is on the cart and I'm snapping pics by the computer.

Moving around in this space is a bit nightmarish. The tripod is almost always pushed back against the fridge so I have to straddle/climb over the tripod legs, while holding onto the tripod so everything doesn't topple over. I have to do that about a million times each day but it's totally worth it.
If you made it this far congratulations + goodnight.
Ashley
psst! Don't forget to check out my photography page for more of my food photography tutorials + resources!


